
Ohhh my friend… thank you for being here today, because I’m genuinely excited to share this one with you.
There are recipes that are fun, and then there are recipes that make you stop mid-bite, stare at the kitchen counter, and whisper, “I cannot believe I just made this at home…” — and these Homemade Kit Kat Crunch Bars fall exactly into that second category.
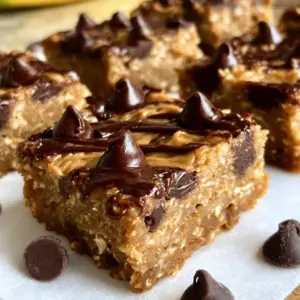
We’re talking crispy wafer layers, silky melted chocolate, and that iconic snap you know from the classic But here’s the twist… homemade means richer chocolate, fresher crunch, and absolutely no weird aftertaste—just pure candy-bar magic.
If you love nostalgic desserts, no-bake treats, or anything that disappears mysteriously fast from your fridge… you’re in the right place. And hey, if you enjoy recipes like this, make sure to subscribe to get new sweet creations straight to your inbox.
Let’s make some chocolate magic together.
Homemade Kit Kat Crunch Bars (Crispy, Easy & Better Than Store-Bought!)
Overview of Recipe Content
These Homemade Kit Kat Crunch Bars are everything you love about the classic Kit Kat bars—but amplified. We’re building layers of crispy wafer biscuits and smooth melted chocolate that set into a perfectly snappable candy bar.
They’re ideal for:
- After-dinner dessert trays
- Homemade edible gifts
- Kids’ lunchbox treats
- Late-night chocolate cravings
What they taste like:
Imagine a buttery, airy crunch wrapped in silky milk chocolate that melts slightly before giving you that signature snap. It’s nostalgic, comforting, and dangerously addictive.
Why you’ll love this recipe:
- No baking required
- Just a handful of simple ingredients
- Budget-friendly compared to store-bought candy
- Freezer-friendly for long-lasting treats
- Customizable with dark, milk, or white chocolate
Ingredients:

- Wafer biscuits (light, crispy layers)
- Milk chocolate or dark chocolate chips
- Butter (for smooth melting texture)
- Optional: peanut butter drizzle or sea salt flakes
- Optional: vanilla extract for depth
Tools Needed:
- Microwave-safe bowl or double boiler
- Spatula
- Square baking pan
- Parchment paper
- Sharp knife for slicing
Substitutions & Additions:
- Use dark chocolate for a less sweet version
- Add crushed nuts for extra crunch
- Swap wafers with graham crackers if needed
- Use vegan chocolate to make it dairy-free
How to Make Homemade Kit Kat Crunch Bars

Okay, let’s get into the fun part. This is where your kitchen starts smelling like a chocolate shop… and honestly, I’m not responsible if you eat half the batch before it sets
Step 1: Prepare your pan
Line a square baking pan with parchment paper. This is your “easy lift” trick later—don’t skip it!
Step 2: Melt the chocolate
In a bowl, melt your chocolate with butter until silky smooth. You want it glossy, rich, and pourable like liquid velvet.
Step 3: First layer
Pour a thin layer of melted chocolate into your pan. Spread it evenly so every bite has that base snap.
Step 4: Add wafer layers
Place your wafer biscuits on top carefully. Press lightly so they sit snug in the chocolate.
Step 5: Repeat the magic
Add another layer of chocolate, then wafers again. Think of it like building a chocolate skyscraper of crunch.
Step 6: Final chocolate coat
Finish with a generous chocolate layer on top. Smooth it out—this is your shiny candy-bar finish.
Step 7: Chill
Refrigerate for 2–3 hours until fully set.
Step 8: Slice and snap!
Lift from the pan, cut into bars, and listen for that perfect crack. That’s the moment.
What to Serve with Homemade Kit Kat Crunch Bars
These bars are rich, so pairing them is all about balance:
- A cold glass of milk (classic and unbeatable)
- Hot espresso or cappuccino
- Vanilla ice cream scoop
- Fresh strawberries for a fruity contrast
- Whipped cream dip for dessert platters
They also look gorgeous on dessert boards alongside brownies, cookies, and truffles.
Tips for Making It Perfect
Let me share a few kitchen secrets I’ve learned (sometimes the hard way ):
- Don’t overheat chocolate—low and slow is key
- Press wafers gently so they don’t crack
- Chill fully before slicing for clean edges
- Use a hot knife for bakery-style cuts
- Sprinkle sea salt before chilling for gourmet vibes
And my biggest tip? Make a double batch. Trust me.
Storage Instructions
These bars actually store beautifully—if they last that long.
- Fridge: Store in an airtight container for up to 7 days
- Freezer: Freeze for up to 2 months
- Reheat? Not needed—just thaw for 5–10 minutes
They taste amazing slightly chilled (almost like a frozen chocolate bar!).
General Information
Did you know wafer chocolate bars became popular in Europe before becoming global candy icons? The original Kit Kat style treat was designed around simplicity—crispy layers + chocolate coating = perfection.
Homemade versions like this one give you full control over sweetness, texture, and quality, which is why they’ve become a viral dessert trend.
And honestly? Once you try them homemade, store-bought just hits different.
Frequently Asked Questions
1. Can I use store-bought wafers?
Yes! That’s actually the easiest option and works perfectly.
2. Can I make these vegan?
Absolutely—just use dairy-free chocolate and plant-based butter.
3. Why didn’t my bars snap properly?
They likely didn’t chill long enough or the chocolate layer was too soft.
4. Can I add fillings?
Yes! Peanut butter, caramel, or hazelnut spread work beautifully.
5. Do I need a mold?
Nope. A simple baking pan works just fine.
6. Can I make them less sweet?
Use dark chocolate and reduce any added sugar toppings.
Conclusion
These Homemade Kit Kat Crunch Bars are everything we love about nostalgic candy—simple ingredients, satisfying crunch, and that addictive chocolate snap—but elevated into something truly special.
They’re fun to make, even more fun to eat, and dangerously easy to share… or not share at all
If you loved this recipe, you might also enjoy:
- No-Bake Chocolate Peanut Butter Bars
- Crispy Rice Chocolate Squares
- Homemade Ferrero-Style Truffles
- Chocolate Wafer Icebox Cake
- Double Chocolate Fudge Bites
All perfect for satisfying that chocolate craving.
Interactive Elements
I’d love to hear from you! 💬
Did you try these bars? Did you add your own twist?
Leave a comment, share your feedback, or tag your creations on Pinterest here 👉 https://www.pinterest.com/poulefrecipe/
And if you snapped a photo… I absolutely want to see it. Nothing makes my day more than seeing your kitchen wins
Nutritional Information (Per Serving)
| Nutrient | Amount |
|---|---|
| Calories | ~280 kcal |
| Protein | 4 g |
| Carbohydrates | 32 g |
| Sugar | 22 g |
| Fat | 15 g |
| Saturated Fat | 8 g |
| Fiber | 2 g |
| Sodium | 55 mg |
Here are some delicious treats you might also love:
- https://poulef.com/chocolate-peanut-butter-bars/
- https://poulef.com/no-bake-chocolate-truffles/
- https://poulef.com/crispy-rice-chocolate-squares/
- https://poulef.com/homemade-fudge-bites/
- https://poulef.com/vanilla-wafer-dessert-cake/

Homemade Kit Kat Crunch Bars – Irresistibly Crispy, Chocolatey & Better Than Store-Bought Bliss
- Total Time: 1 hour 45 minutes
- Yield: 10–12 bars 1x
- Diet: Vegetarian
Description
These Homemade Kit Kat Crunch Bars are crispy, chocolatey, and irresistibly addictive. A no-bake layered dessert made with crunchy wafers and smooth melted chocolate for the perfect snap.
Ingredients
2 cups wafer biscuits (or vanilla wafers)
2 cups milk or dark chocolate chips
2 tablespoons unsalted butter
1 teaspoon vanilla extract (optional)
Pinch of sea salt flakes
Instructions
1.
2. Line a loaf pan or square pan with parchment paper
3. Melt chocolate chips with butter in short intervals until smooth
4. Add vanilla extract if using
5. Spread a thin layer of melted chocolate into the pan
6. Place a layer of wafer biscuits on top
7. Cover with more melted chocolate
8. Repeat layers until ingredients are used
9. Finish with a final chocolate layer on top
10. Smooth the surface evenly
11. Sprinkle sea salt flakes on top
12. Refrigerate for 1–2 hours until fully set
13. Slice into bars and serve
14.
Notes
Use high-quality chocolate for best flavor and snap
Make sure bars are fully chilled before slicing
Cut with a warm knife for clean edges
Store in fridge up to 7 days
Freeze up to 2 months
- Prep Time: 15 minutes
- Cook Time: 1 hour 30 minutes (chilling time)
- Category: Dessert / No-Bake
- Method: No-Bake / Chilling
- Cuisine: American / Homemade Candy
Nutrition
- Serving Size: 1 bar
- Calories: 210
- Sugar: 18g
- Sodium: 90mg
- Fat: 11g
- Saturated Fat: 6g
- Unsaturated Fat: 4g
- Trans Fat: 0g
- Carbohydrates: 26g
- Fiber: 1g
- Protein: 3g
- Cholesterol: 10mg
Table of Contents

Gianna Poulef
I’m Gianna Poulef from Poulef Recipes. I love sharing perfected dishes from my kitchen. I’m sure they’ll earn a spot in your heart. Let’s savor this journey together!.
Let’s be friends!