Thanks for being here! I’m so excited to share this recipe for Gooey Chewy Blondie Dessert Bars Made Easy with you. These blondies hold a special place in my heart; they remind me of cozy afternoons spent with friends or family, gathered around the kitchen table, laughter mingling with the sweet aroma of baked goods wafting through the house. The best part? They’re an absolute breeze to make — perfect for those moments when sweet cravings strike, and you want something indulgent without spending hours in the kitchen.
Overview of Recipe Content
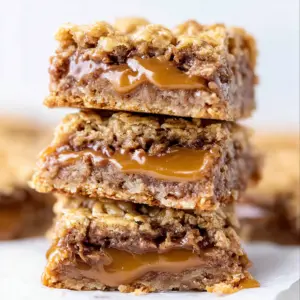
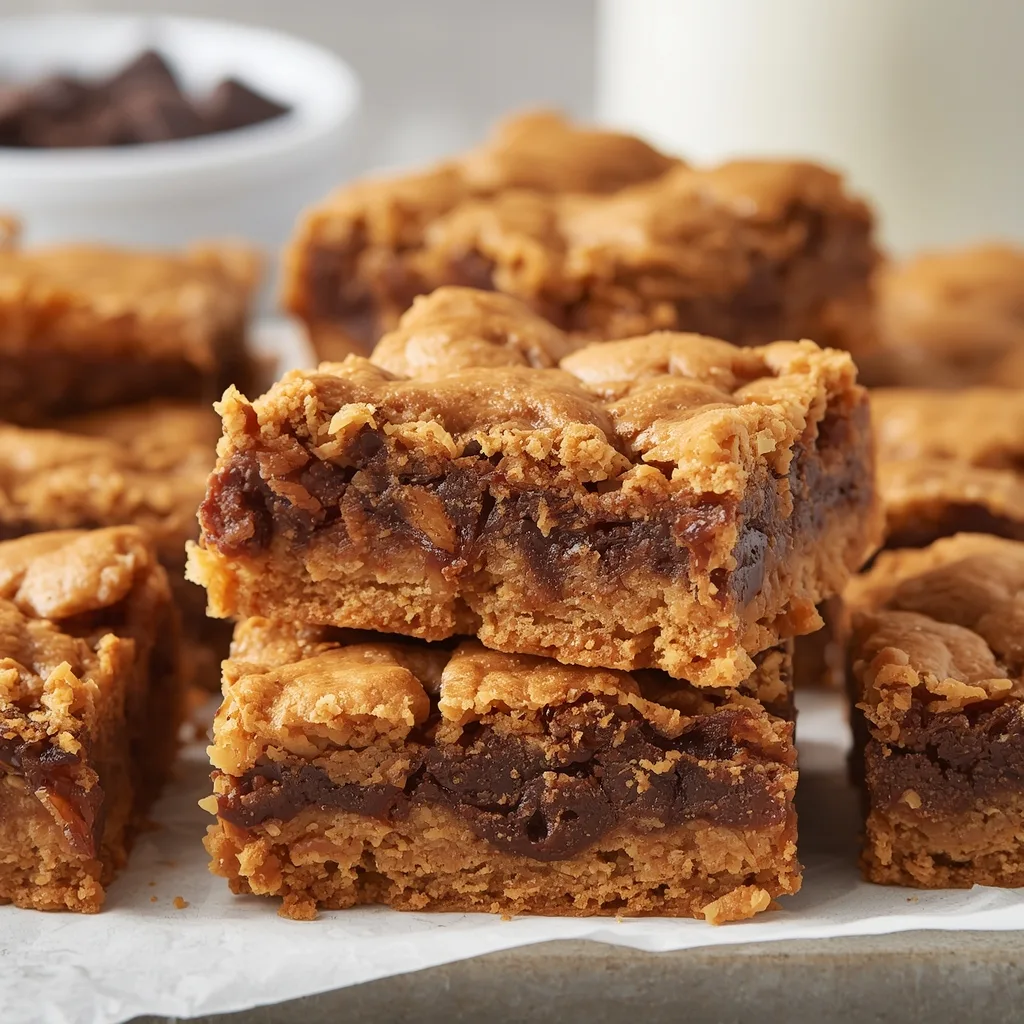
Gooey Chewy Blondie Dessert Bars are a delightful twist on classic blondies that promise a rich, fudgy texture with just the right amount of chewiness. These dessert bars are perfect for any occasion, whether it’s a family gathering, a potluck, or just a simple sweet treat after dinner. With their caramel undertones and the nutty flavor of brown sugar, they’ll quickly become a favorite among your friends and family.
What’s great about this recipe is how versatile it is. Whip them up for a birthday party, enjoy them on movie night, or serve them warm alongside a scoop of ice cream. Plus, they can be made in under an hour — talk about a crowd-pleaser! Made with simple ingredients, they offer a delightful combination of sweetness and comfort, and you’ll find yourself reaching for seconds (and maybe thirds) without hesitation.
Ingredients

- 1 cup packed brown sugar
- 1/2 cup granulated sugar
- 1/2 cup unsalted butter, melted
- 2 large eggs
- 2 teaspoons vanilla extract
- 1 1/4 cups all-purpose flour
- 1/2 teaspoon baking powder
- 1/2 teaspoon salt
- 1 cup chocolate chips (or your favorite mix-ins)
Tools Needed
- Mixing bowls (one large and one medium)
- Measuring cups and spoons
- Whisk or electric mixer
- Rubber spatula or wooden spoon
- 9×13-inch baking pan
- Parchment paper (optional, for easy removal)
Suggested Substitutions and Additions
- Use brown butter instead of regular butter for a nutty flavor
- Swap chocolate chips for white chocolate or butterscotch chips
- Add chopped nuts like walnuts or pecans for a crunchy texture
- For a health twist, substitute half the flour with almond flour or oat flour
How to Make Gooey Chewy Blondie Dessert Bars Made Easy
Step 1: Preheat Your Oven
Start by preheating your oven to 350°F (175°C). This is crucial for achieving that perfect gooey texture. With the oven heating, you can now prepare the batter!
Step 2: Mix the Sugars and Butter
In a large mixing bowl, combine the melted butter, brown sugar, and granulated sugar. Use a whisk or an electric mixer to blend it until the mixture is smooth and creamy. You want it to have a nice caramel-like quality, and the smell will make your mouth water!
Step 3: Add the Eggs and Vanilla
Next, crack in the eggs and pour in the vanilla extract. Continue mixing until the batter is well-combined. The mixture should look rich and glossy — trust me, this is where the magic begins.
Step 4: Combine the Dry Ingredients
In a separate medium bowl, whisk together the flour, baking powder, and salt. Gradually add this dry mixture to the wet mixture, stirring until just combined. Don’t overmix; a few flour streaks left in the batter are perfectly fine!
Step 5: Fold in the Chocolate Chips
Gently fold in the chocolate chips or any other mix-ins you prefer. Imagine those bits of ooey-gooey goodness melting into that warm batter — can you already taste it?
Step 6: Bake the Blondies
Line your baking pan with parchment paper for easier removal, or simply grease it well. Pour the batter into the pan, smoothing it out evenly. Bake for about 25 to 30 minutes, or until the edges are golden brown. You’ll know it’s ready when the top looks nice and shiny, and a toothpick inserted in the center comes out with a few moist crumbs.
Step 7: Cool and Slice
Allow the blondies to cool in the pan on a wire rack. Once they’re cool enough to handle, carefully lift them out if you used parchment paper. Slice into squares, and watch how the chocolate chips ooze slightly as you cut. It’s all about that gooey factor!
What to Serve with Gooey Chewy Blondie Dessert Bars Made Easy
These blonde beauties shine even brighter when served with a scoop of vanilla ice cream on the side. The contrast of the warm, chewy blondie and the cool, creamy ice cream is simply irresistible. You could also drizzle with a bit of caramel sauce or serve with fresh berries for a fruity twist.
If you’re a fan of cozy recipes like this, Baked style pecan pie oatmeal cookies, Chewy gluten free peanut butter oatmeal cookies, Flourless banana oatmeal muffins, and Walnut cinnamon chia oatmeal cake would also be delightful companions.
Tips for Making It Perfect
- Prepare your ingredients ahead of time, so everything is ready to go. This makes the process smoother and more enjoyable.
- If you accidentally overbake your blondies, don’t despair! A scoop of ice cream will save the day and add a lovely contrast to the crumbly texture.
- If you prefer a softer blondie, check for doneness a couple of minutes earlier. They will continue to cook slightly as they cool in the pan.
- Considering making a double batch? Just use two pans and share some with a friend — or keep them all for yourself!
Storage Instructions
These blondies keep well! Store them in an airtight container at room temperature for up to 5 days. If you want to keep them longer, freeze them for up to 3 months. Just make sure to wrap them individually in plastic wrap and place them in a freezer-safe bag.
General Information
The roots of blondies trace back to the classic chocolate brownie. However, instead of cocoa powder, blondies use brown sugar, which gives them their unique color and flavor profile. Each bite brings you that sweet warmth, reminiscent of freshly baked cookies cooling on a kitchen counter. For me, these blondies represent countless memories of family gatherings, laughter, and sharing sweets with loved ones.
Frequently Asked Questions
- Can I make these blondies gluten-free? Absolutely! Substitute the all-purpose flour with a gluten-free flour blend, and you’ll still get that chewy goodness.
- How long do the blondies last? Kept in an airtight container, they can last about 5 days at room temperature, or up to 3 months if frozen.
- What if my blondies turn out too dry? They should be slightly underbaked to maintain that gooey texture. If they do seem dry, serve them alongside ice cream or a drizzle of chocolate sauce.
Conclusion
Gooey Chewy Blondie Dessert Bars Made Easy are truly special because they capture the essence of comfort food. They’re simple to make and deliver that warm, sweet indulgence that satisfies cravings time and time again.
Here are some recipes related to Gooey Chewy Blondie Dessert Bars Made Easy ideas:
Baked style pecan pie oatmeal cookies, Chewy gluten free peanut butter oatmeal cookies, Flourless banana oatmeal muffins, Walnut cinnamon chia oatmeal cake
Thank you for joining me in the kitchen today. I can’t wait to hear how you and your loved ones enjoy these delicious bars!
Interactive Elements
If you’ve made these blondies, please leave a review or comment below. Also, I would love to see your creations! Share a photo on Pinterest.
Nutritional Information
Serving Size: 1 blondie
Approximate Calories: 180
Carbohydrates: 22g
Sugar: 12g
Fat: 8g
Protein: 2g
This nutritional breakdown may vary based on specific ingredients used, so I recommend running your own calculations if you’re tracking macros closely.
Enjoy your baking adventure!

Lydia Madisyn
Lydia Madisyne is a food lover and recipe creator who believes cooking is all about love, comfort, and connection. On poulef.com, she shares wholesome, flavorful dishes and everyday inspiration to make your kitchen a place of joy.
Irresistible Gooey Chewy Blondie Dessert Bars Made Easy – 9 Ingredients
By Lydia Madisyn
Ingredients
Instructions
Save & Follow ❤️
PoulefRecipes : Easy recipes - Dinner ideas & More
Save to Pinterest Follow Account